It’s been a little time since I had a good update of info and experience with working on the Specialized Turbo S (in this case, the first gen version) and have had notable experiences that deserve to be logged and written about. So, here goes.
In my last post, I was working with a Turbo S that had error code LEDs for the 1st, third, and fourth on the battery and would subsequently turn off after about five seconds of turning it on. I have been working constantly with Specialized on this one and the valuable experience I have gained will be explained below. In the end of my discussions with the Turbo experts at Specialized, it was determined that the wiring harness was malfunctioning and needed to be replaced. It was estimated at about a two hour job, uninterrupted and I think that accurately reflects the time it takes for someone familiar with the Turbo. Below, I will run through the process and how to do it with advice on what to avoid doing or what helps the install go more smoothly. As of now, this is the first coverage I can find anywhere on the Internet on how to do this, so I hope the documentation is thorough and helpful.
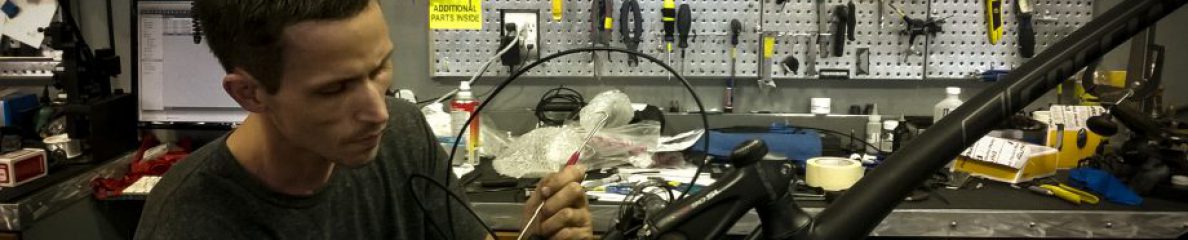
After swapping several of the components with new ones from a known working 2013 Turbo S, I encountered the same errors on a consistent basis (even with two other batteries). When the wiring harness came last week, I was psyched and ready to dive in. I took photos of the whole process so you can visually compare when working on this project yourself.
The first part of the project involves removing the old wiring harness first. This is literally every wire that runs from the handlebar connectors (the brake motor disengage, the mode selector, and the control interface) to the back of the bike. First, remove the small 2.5mm hex bolts that attach the frame stops/guides for the wires on both side of the frame where the downtube meets the headtube.


Once this is done (by the way, put these tiny screws in a magnetic parts bowl, because you WILL LOSE THEM OTHERWISE), remove the anchor bolt on the non-drive side of the bike (which holds the main part of the wire harness in place). It is a 6mm bolt that uses blue loctite. In addition, this is a great time to replace the rear derailleur cable as the housing where it fits into the rear derailleur housing stop usually is bent and stretched. Clip the housing on each end clean. Any exposed housing casing will cause friction in the cable and affect shifting. In the fourth photo, you will see a tiny 2mm screw right in front of the wire harness in the battery compartment. You MUST remove this screw (which holds the brake housing securely under the downtube). More photos below and then the next step.


When doing this project, I suggest removal of the crank. While the bottom bracket isn’t necessary to remove, uninstalling the crank is a good idea so you have better angles of working with the bottom bracket access point on the frame. It’ll make your life a whole lot easier. I also discovered that you only need to loosen the two hex bolts (5mm) inside the bottom bracket access point in order to successfully route the harness. Each individual wire (3 of them, black, red, and orange) is easiest to pass through the routing individually. When pulling the wiring harness center out of the frame, it’s a good idea to take a nice flat tip screwdriver and carefully pry the rubber casing on the harness wires going down the battery compartment before pulling out the main unit. The connection plug to the front wiring (7th and 8th photos) must be routed through the frame. Allow some slack ont he wire from the frame stop and push the frame stop perpendicular to it’s mounting position through to the inside of the frame and then the wire connector itself.


Take a good look at the above photos and then I will explain them. At this point the bulk of the wiring harness from the front of the bike should be ready to remove. Now, we take a look at the progression of the wires through the bottom bracket and out to the hub motor and the rear taillight. The rear wires are encased in “Chinese finger trap” style mesh once they exit the frame to the hub motor. As you compress its length, it widens and allows removal. The new harness came with heat shrink tubing to cover the connections and the mesh harness is used again to protect the wires running into the frame. The fittings for the red, black, and orange wires are compression fittings into the plastic plug that connect to the motor. It takes a significant amount of pulling force to remove these, but they do so without much of a problem. The key is installing the new connectors back into the plug, which I will cover shortly. The next few step include literally pulling on the old wires to get them to exit under the pressure plate (the motor and communication wires) and the seatpost light wires (through the seatpost and then through the seat tube). By the way, I think one of the hardest part of the install is the installation of the seatpost light. However, that is a sweet feature of the bike and requires considerable attention. i show a decent way to do it, though I think there might be an even better way. Here is the next series of photos.


The next part is great. This is where the skill comes into play. Before the installation of the new wiring harness, I suggest using an air compressor with a ‘crack pipe’ disc adaptor to clean out the frame of the dust from usage and age. My buddy, Curtis, photobombed the second photo pretty well and helps me keep focus during these diagnoses. To loosen the battery pressure plate mounts so you can route the wires, use a long L-hex 5mm to turn them counterclockwise until you can move the plate from the battery compartment with your hand a decent amount. Note that the frame routing for the rear chainstay motor wires is quite small. I suggest you route each under the pressure plate and the chainstay separately. Route each under the pressure plate and then each through the chainstay (check the last photo above for the entrance point). The wires are pretty stiff and pass through the frame relatively well. Once you see each (with a nice flashlight), use a pokey tool to route them out of the chainstay. At this point, slide the mesh protector onto the wires and the shrink wrap from the earlier photos. This will make your life easier in the next few steps. Apply a tiny tiny tiny amount of dielectric grease to the brass collars of each wire before pushing into the original plastic plug. This will help seat each wire in the plug a little easier. It is tough to push them through. Use a small blunt pokey tool to push from the rear of the plug. I did it successfully on the second attempt. Then I I hit the shrink wrap material with a lighter and tightened to the connector and wires.
Once this is done, it’s a matter of connecting everything. To route the seatpost light wire, I ran a brake wire cable through the tubes and out the seapost drilled hole, taping the connectors in a row to minimize diameter of the hole it had to exit through.


Once I had done this, I realized the new harness use d a male and female connector for the rear taillight. Well, I rewired the old connector so it fit, and it worked flawlessly. 🙂
Here is the last of the install photos.


I also realized that the control unit docking station wire was malfunctioning, so I replaced that as well from a known working Turbo S in the shop. Other than a small few inconsistencies in startup, the firmware was updated successfully as well as the battery communication issue software. I am still waiting to hear back on the error reports from Specialized. Bike performs successfully 90% of the time, but a final confirmation from them is necessary. Thanks for tuning in. More to come. I am compiling a great Campagnolo EPS diagnosis article that should be up in the next few days.
SNC, David Polk
