Further Troubleshooting the Turbo S & Other Fun Things

Well, I had two choices when I got home from the shop.  The first was to update my recently built cyclocross bike with some newly acquired 10 speed 105 and Ultegra (along with two nice red Specialized rib cages).  The second was two write a new article on first thoughts with the newest edition of the Turbo, which has split into several more models and options and really continues to develop the lower price point and affordability.  So, thus, I am writing the article (mainly because I don’t really care about 9 versus 10 speeds for a few more days of riding around in dirt and gravel.  Pretty sure it is working quite well).  In addition, I have come across some good troubleshooting problems and solutions (particularly the first gen Turbo S from 2013-14).  In fact, the solution for the issues in diagnosis are still in the process of being resolved.  However, due to some great communication with the lead Turbo experts over at Specialized, we have a solid direction toward fixing the issue and this will really mark the first time since they’ve arrived on the market that one can assess the long term durability and dependability.  I will go ahead and say that I certainly think it is worth it and, if you ride regularly (or wish to) year round, it’s a far better bargain (particularly in the DC metropolitan area) that sitting in traffic all the time with a car.  Let’s dig in!

First, I had a new customer stop through recently with an amazing modification of a 2015 Turbo S that made my eyes pop thinking about future possibilities with ebikes.  Her name was Marissa Muller and her website is http://www.marrissamuller.com.  Her Turbo had not only a aero wind shield, but could run indefinitely with the solar panel she attached to her Burley bike trailer.  Unbelievable!  Using extension wires with Rosenberger connection plugs (the same kind on the Turbo), she outfitted it so the Turbo could keep charging at a rate slightly more than the rate of battery discharge from riding it.  Essentially, it charged faster than you could deplete it!  Carrying an extra battery (which apparently wasn’t needed), this woman rode cross-country on an ebike pretty much without ever plugging it in.  Think if the frame was covered in super efficient solar panels.  Never charge the bike.  Use the free energy of the sun.  It’s both a noble concept and challenge to make it happen.  Unfortunately, adding this technology directly into the bike now would make the price skyrocket to a likely 15k or more.  So, rigs like these now are proven for the meantime and is a great way to tour the country without fear of running out of battery power.  Here are some photos of the setup!

WP_20150817_12_55_17_Pro WP_20150817_13_47_34_Pro WP_20150817_13_47_45_Pro WP_20150817_13_47_52_Pro WP_20150817_13_48_59_Pro WP_20150817_13_49_04_Pro WP_20150817_13_49_15_Pro WP_20150817_13_56_02_Pro

She was super nice and had a great knowledge base to understand how the setup worked.  With extension Rosenberger connectors, she was able to route a cable from the solar panel to a the front of the Turbo into the charging port.  It was by far the best mods I have seen yet on an ebike.

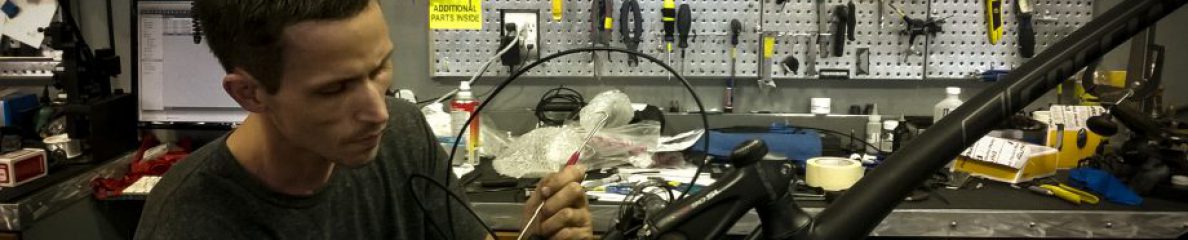
Concerning the troubleshooting, I had a customer come in from visiting other shops with unsuccessful results in need of service with his Turbo S (first gen).  When the battery was started up, it’s on-board diagnostic LEDs showed errors for the motor, light, and remote.  The battery would finish the diagnostic and then immediately shut down.  This is a first for me.  After speaking with some of the experts at Specialized on this case, they suggested I take a look at all of the connections to make sure they were tight and not discolored.  Apparently, while a rare case, some of the Rosenberger connections would have one of the two pins discolored dark, which would mean it somehow went bad.  This was not the case as you can see in the photos.

WP_20150924_11_01_46_ProWP_20150924_11_04_49_Pro  WP_20150924_12_35_57_Pro WP_20150924_12_36_08_Pro WP_20150924_12_36_33_Pro WP_20150924_12_36_49_Pro WP_20150925_18_27_50_Pro  WP_20150925_18_32_50_Pro WP_20150925_18_33_03_Pro WP_20150925_18_33_08_Pro WP_20150925_18_38_15_Pro

I even removed the central core of the wiring harness at the top of the downtube to check for bad connections and/or frayed wires.  As you can see, there were none that stood out as bad.  I triple checked the regular connections of wires at the front of the bike (where the motor disengage connects to the remote and mode wires, and then into the bike).  The connection for the light was not quite tight and when tightened, it responded well by turning on correctly, though it still read as a fault in the system.

WP_20150924_10_59_30_Pro WP_20150924_10_59_46_Pro WP_20150924_10_59_58_Pro WP_20150924_11_00_13_Pro

After inspecting everything and also trying to remove and reinstall the battery several times (and unplugging the motor connection near the non-drive side rear dropout and cleaning it with electronic component cleaner), I am of the assumption at this point (along with the guys at Specialized) that the wire harness may indeed be worn out.  In an effort to fully check this before replacing, I will be performing a diagnostic of the ebike with the newest edition of the software.  Once this has been confirmed, I will update the article accordingly and link this one to the other articles I have on the Turbo.  It is reasonable that the wire harness is worn out for a three year old bike, but maybe not since this one was purchased only about a year ago.  Either way, it seems to be solvable issue.  If the wire harness does need replacement, this is an extensive installation that will require quite a bit of time.  I plan to record this process with my GoPro and will post it here with the conclusion of the article.

On a side note, the battery error report showed some irregular data as well as the absence of data regarding some controls of the motor and battery cells.  For instance, there is a field of data readings that mention a note every time a permanent failure occurs and this data was completely gone from the report.  Anyways, once the issue is resolved, the Turbo should be back up and running.  I also used a different battery from a brand new Turbo with the same exact error LEDs, so this is also why I believe the issue is not the battery itself, but the communication between it and the other components.

Me working on fixing these ebikes...


Congratulations to Peter Sagan today on winning the UCI World Road Championship.  It was such an epic win and was smartly finished by attacking on the cobblestones.  It was the type of race where perseverance and smart racing skills took the field.  Let’s look forward to some special edition painted Specialized bike for him winning.  Thanks for tuning in!


  • SNC

Specialized Turbo S Troubleshooting and Diagnosis Pt.1

Welcome to Part 2 of 3 in my Specialized Turbo S Long Term Review.  I feel like this is some of the most essential information that I can apply in one place that will keep Turbo pedalelecs running beautifully.  However, I do feel that there is a “low-ceiling” limit to the depth that the Turbo can be maintained — even by an experienced and well-equipped shop.  In certain instances, the bike may have to be sent to the factory.  I am of the belief that this is being addressed and the bike will become even more modular and accessible.  That being said, there is a ton that will be covered here and includes several years of work and knowledge.  While I will be mostly highlighting troubled issues, the Turbo overall has been very trouble free and generally without issue.  This just compiles issues from many Turbos I have serviced since their release.

Onward.


So, I turned on my Turbo and started pedaling and the motor did not kick in as expected in Full Active and Eco modes.  What’s up with that?

I am starting with this problem because I think it has occurred more than any other issue.  There are a number of symptoms that cause it to happen and a number of solutions.  First, the battery is nearly dead.  Charge it up and try again.  The next thing I would try is to simply turn it off and turn it on again to try it.  This occurrence has spanned several Turbo S bikes on a rare occasion and has been remedied every time in the shop.  The next reason it might not turn on is that the battery may not have been installed properly or the pressure plate at the bottom of the battery “hanger” is not correctly adjusted.

With the battery pressure plate, I have found it to be different on each bike and definitely has a “correct” pressure for the Turbo to function right.  On the bottom of the bike behind the bottom bracket is an access plate that is secured by small 2mm bolts.  Remove these and set aside in a magnetic parts tray so they don’t end up lost on the ground.  Once the anchor plate has been removed, look inside and you’ll see wires, a couple hex bolts, and the shell of the bottom bracket.  Locate the 5mm hex bolt right in the center anchored into a flat plate.  This is an adjustment bolt for moving the battery up and down within the battery dock.  It provides pressure against the battery so vibrations do not disrupt the connection at the opposite end of the down tube.  To be noted, one would likely expect the phrase, “Why not just crank that thing down and really lock it in there?”  Well, here’s why.  If the motor does not seem to be engaging as aforementioned, this same issue can occur if the battery is adjusted to tightly in the dock.  Just as the battery has a little “wiggle” room, so does the connection to the battery inside the frame at the top tube and head tube junction.  If you remove the battery and look at the top of the battery dock, you’ll see where it plugs in.  With your fingers or a scribe, you can definitely see gaskets on the side of the connection and its ability to move slightly up, down, left, or right with a small amount of push.  The general rule is to begin tightening the pressure plate while using your free hand to try and move the battery up and down in the frame.  If you hear any sharp noises when it contacts the top or bottom, continue tightening.  Once there is little movement (0.25-0.5mm), stop tightening and use the key to remove the battery.  If it is too tight, it will be difficult to get the battery out.  I have found that each Turbo is slightly different, which is a great reason to have the plate for adjustment.

Another item to check is the connections between the brake and the control unit and the connection to the wire coming out of the frame.  Also, as a measure of being thorough, there is an additional connection inside the frame at the head tube where the light plugs into a parallel connector with the control unit (Several times, fault signals on the battery will indicate the light and control unit both having an issue when it is mostly one or the other).  By checking these connections, I imply:  Are they tight and correctly aligned for the individual connector pins? Have you applied a tiny amount of dielectric grease to the threads of the connectors? Are the connections and wires constantly rattling or loose?  Try checking each of these regularly when servicing as a quick way of eliminating them in the event of an issue.

So, I turned on my Turbo and everything started up, but a flashing code reading “short circuit” is displaying on the control unit?  Is that bad?

Well, it’s not necessarily good, but can be fixed easily.  Sometimes, constant vibration, continued exposure to the elements, and leaving the rubber charging cap off of the Turbo for extended amounts of time can cause an interruption in the electrical system and send a red flag to the control unit.  It’s a feature designed to override the system much like a circuit breaker so no damage occurs to vital components.  By using the Turbo diagnostic tool plugged into the frame (with battery in) and into a laptop, you can run the diagnostic software and release the hold on the circuit with a convenient button on the screen.  This software is a very important tool in confirming that the motor, battery, control unit, and lights are working properly and displays a wealth of information and reports for keeping Turbos happy and healthy.

My Turbo has gone insane and decided to run at 28mph like a throttle as soon as I hit the pedal.  I don’t even need to pedal. Glad it’s spec’d with great disc brakes.  Does it need an exorcism?

Not quite.  In the early days, Specialized might have taken this approach, but with the “Innovate or Die” theme currently in trend, we now know it’s quite real. This issue has only occurred once, yet is important enough to catalog and solve for any future happenings.  In my prior post, I detailed the symptoms of the bike while it was secured in the bike stand.  I took the opportunity to  remove and clean some of the components on the bike and the frame (After slowly and carefully removing the kickstand, I have realized that unless it is absolutely necessary, don’t ever remove it.  It is tedious because of the frame angles to loosen and tighten the 8mm hex bolt and I found that it didn’t improve access to the electronics and pressure plate under the bottom bracket.  It is a very sturdy dual kickstand that stays tight and balances great.). That being said, I removed the bottom bracket (EVO386) with a socket and outboard cup adaptor and found plenty of access points into the frame to see the wires running to the motor and seatpost LED and the hex bolt adjustment for the pressure plate (5mm) and the lock mechanism with it’s integration into the battery release.  I wiped the battery dock and the battery with isopropyl alcohol.  The terminal connections were also cleaned with isopropyl and a swab.  With some time open in the service schedule, I also decided to remove the external frame charger / battery dock connection unit from the top end of the down tube to make sure all of the connections looked secure and free of debris and moisture.  Thanks to a well-sealed compartment, everything looked great.  I took notes as well on the direction, colors, and pairing of wires that interfaced with the unit.  Red and black paired wires run directly from this to the bottom bracket shell, under the EVO386 BB, and through the non-drive chainstay to the external port near the rear wheel.  A shorter set of these two wires also connects the battery dock connection to the external charge port.  Two sets of blue and brown wires run from the unit to the headtube and into the brake / control interface and also to the bottom bracket shell and into the seat tube to connect into the wires running from the saddle’s integrated LED through the seatpost. One triple set of wires (blue/brown/green) run from the external charge port in the frame to the top of the battery dock where the battery connects to the system.  Lastly, an orange wire runs from the front light to the connection with the control interface (wired in parallel).  As a side note, this is why the diagnostic on the battery will show both the light and control interface having an issue when it could potentially only be one of them.  Good things lights are pretty easy to check.

Once I had satisfied my curiosity of understanding the Turbo S better, I moved on to reinstalling the parts and activating the wheel like before.  I let it run continually for over five minutes with no discernible change.  Continuous operation, only to be paused by giving the brake a solid squeeze.  If the wheel was touched, the throttle would pick up again.  This was also true for pressure on the pedals.  In these situations, I was lucky to have another in the store to help eliminate components.  Taking a brand new rear wheel from the second Turbo (after testing to make sure it was operational), I installed it into the first and powered the system.  No activation of Full Active or Eco modes, but No Power worked as expected and Regen mode seemed more difficult than normal as mentioned with the original wheel.  This is the only area that I am not quite sure what to think of yet.  That’s what the techs at Specialized are for. Continuing with the diagnosis, I also swapped the battery with no effect.  Reinstalling the original wheels and batteries to each Turbo, I then swapped the control interfaces.  This also did not yield any effect.  With the original wheel, the throttle accelerated as before (One thing I might try today is to try both battery, control interface, and new rear wheel from the second Turbo into the first.).  The last thing I did was to put the wheel from the service Turbo into the new Turbo.  It accelerated to 28mph.  Thus, my conclusion (though I will wait for confirmation from Specialized) is that the wheel needs to be recalibrated–specifically the motor.  If this is the case, it will go back to the factory for a quick turnaround and then I’ll have an update on a future post about the issue’s resolution.  This was a great opportunity to fully inspect the bike from top to bottom, inside and out.

I am going to continue this post through the weekend with some other minor issues and fixes that will keep the Turbo S running smooth and fast, but figured that it’d be good to start posting the article for any feedback or questions.

Here are photos of the above parts:


More to follow!  – SNC

Turbo Diagnosis Update

Hey everyone! The Turbo S Diagnosis and Troubleshooting article is almost complete. There has been a slight delay because of a new issue that arose within the past few days that is still in progress of being solved and fixed.

One of the 2014 black Turbo S models came in with a particular issue with the motor engaging once pressure to the pedals occurred in Full Active Mode and Eco (30%) mode. You might think, “Isn’t that what the bike is supposed to do?” Well, yes. However, with this particular one, the motor engaged to the Turbo max speed of 28mph without disengaging when the brake was pulled and acted as a throttle (no pedaling required) rather than an electric assist. This could be compared to the gas pedal on your car sticking on the floor and your car traveling at top speed until you shut it off or change gears (on the Turbo, going to No Assist mode or Regeneration mode would disengage the motor). As a side note, one the Turbo was in Regeneration mode, it was much more difficult to pedal than normal while in this mode and the wheel would take a small 1/8 to 1/4 turn backwards when the pedals stopped turning.

As you may have guessed with continual throttle at 28mph, it totally cooked the rear brake pads and most of the front.

So, I will be problem solving it for a day or two more and running several tests while collaborating with Specialized technicians to diagnosis this and of course, finish up the results in Part 2 of the Turbo Review. Thanks for being patient. I hope this gets you curious about the bike and working on it more. I still think the bike is fantastic and doesn’t normally reflect any or all of these problems. In large, it is the most trouble-free electric assist bike I have worked on out of over twenty different brands. These issues are published to conglomerate the most information possible in order to have the largest audience possible understand how to work on the them and maintain them.

– SNC