Specialized Turbo Parts Installation

The Turbo S comes mostly assembled in a large sturdy box from Specialized that also has plastic support handles in lieu of simple cardboard ones since it still does weigh about 48 pounds.  The battery is separately packaged in the box in additional cardboard and usually has a decent charge right from the start.  I always un-package it and plug it into the included AC charger so it is at full charge once the bike is ready to ride.

The handlebars and stem need to be installed onto the steerer tube of the fork ) appropriately spaced with the right amount of spacers.  Once this is done, any remaining packaging is recycled and removed.

The seatpost is installed with grease (for alloy) and fiber grip paste (for carbon on the older models).  Right before install the two wires coming from the saddle’s LED need to be connected to the opposing two wires coming from the seat tube.  One of each set will have a blue line on it.  Connect those two and then connect the other two.  Coil the additional wire into the seatpost as you mount it into the frame.  Torque the seatpost binder bolt to a value of 5Nm.  Clamp the bike in the stand with moderate pressure to hold the bike firm while finishing the build and tuning.Turbo Integrated Tailight

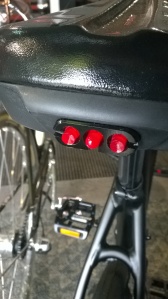
The Turbo S uses a MegaEVO386 bottom bracket and compatible crank (30mm spindle).  I remove the crank and use a torque wrench to check the outboard bearing bottom bracket cups to 40Nm.  I then make sure to use a thicker grease on the spindle before installing it into the BB.  This helps ensure that there are no creaking or clicking issues.  Most of the time, I find that the factory build installs it correctly and I have to just double check it.EVO386 Bottom Bracket

I then take both wheels off of the bike.  The front is a thru-axle as is the rear wheel.  Both are necessary to adequately support the wheel in the frame.  After greasing the thru-axle and checking to make sure the cassette lockring is tight, I true and tension both wheels.  Nearly every time I find the wheels are already well-built and simply detension the wheel from shipping and production and lubricate the spoke nipples.Rear wheel motor specThru axle and torque spec

After getting the wheels ready, I like to take care of a few things on the bike that is easier to do without the wheels on.  I wipe the frame down with rubbing alcohol at all points of contact between parts and components. For instance, this would include crank arm pedal threads, both front and rear dropouts, all frame fitting contact points (where cable and wires enter and exit the frame), brake calipers (with pads removed), handlebars, the surface area under the grips, and the rotors on the wheels.  Then the wheels are installed and torqued to the required spec with a torque wrench.

At this point the handlebar is installed, the bottom bracket checked, the wheels checked and trued and cleaned, and the frame is prepped.  After the wheels are installed, it is time to center the brake calipers on the rotors.  At this time, it is also suggested to toque the rotor bolts to spec as well (3.5-5Nm).  Loosen the top and bottom mounting bolts for each caliper and  until they move freely back and forth.  Normally there is blue Loctite on these bolts.  If none is present, apply some.  Then, with the mounting bolts loose, use one hand to press down on the caliper body and with the other hand, squeeze the brake lever.  Slowly snug down the top and bottom mounting bolts until the body does not move easily.  Release the brake lever and place a white piece of paper below the caliper and rotor.  You should be able to easily see the space on each side of the rotor from the pad.  If it is uneven, slightly loosen each of the mounting bolts and center the pads over the rotor.  Once this is done, tighten and torque the bolts to spec and spin the wheel.  Listen for any sound of rubbing and observe that the rotor is true and straight.WP_20140515_008

Shift through the gears in the rear until the chain is positioned in the largest cog (the lowest gear).  Set the LOW limit screw so that the derailleur may very slightly go past the last cog (about a half of a millimeter).  Then, down shift and use the barrel adjuster to correct the cable tension for the smoothest shifting.  Once the chain is positioned in the smallest cog (the highest gear), adjust the HIGH limit screw so the chain is in line with the cog.WP_20140515_018

Now that the ‘bicycle’ parts have been checked and tuned, it is time to install the frame fittings the wires enter and exit.  These are small 2mm hex bolts that should have a small amount of blue Loctite on them.  If they don’t apply some.  Avoid using a ball head hex key to install or remove these as it tends to either strip the bolt head or simply not apply enough bite to turn the bolt.WP_20140515_011

Check the rubber pad in the frame slot for the battery to make sure it is flush against the base of the panel and is covering the wires that run the length of the down tube.  Then, clean the contact points at the top and bottom of the battery slot and on the battery with isopropyl alcohol and place the battery in the frame bottom side first.  When the top half connects into the frame, you should hear a distinct click, indicating the battery is installed correctly.  Attempt to wiggle the battery to ensure it is installed right and test its removal by turning the key located near the bottom bracket on the non-drive side.  Keep this key handy at all times!  It is ridiculously hard to remove the battery without the key.

With the battery installed, the Turbo is ready to rock!  Press the power button on the battery to start up the system.  Now on to the electronic parts and diagnosis!


– SNC


Basic Wheel Truing and Tensioning

Wheels are perhaps one of the most complex parts of cycling in that they are the contact between the rider and the ground or pavement and can be considered the best upgrade a bicycle can have.  Properly trued and tensioned wheels at all levels greatly improve the quality of the ride and the longevity of their peak performance.  Attention to detail, patience, and practice will provide you with worry free operation time and time again.  In the rest of the article, I’ll be referring the true and tension of a wheel as simply wheel truing because both are necessary to keep a wheel straight and rolling correctly.

I believe that anyone can true their own wheels (except for some tubulars and several specific racing wheels) with a bit of guidance and attention to detail.  Taking the time to check your wheels after long rides and on a regular basis will allow you to minimize the amount of truing needed.  A wheel can only be trued so many times before there are no more threads left to tighten on the spokes.  Below is a diagram of a section of rim, a spoke, and a spoke nipple.

Components of Wheel

In this diagram, the spoke is threaded into the spoke nipple, which is anchored by the small lip on the inside of the rim. There are about 10mm of threads on the majority of spokes. Usually, 5-8mm of threads are threaded into the spoke nipple, based on correct spoke length calculation.  This leaves several millimeters of thread to be tightened during the life of the rim and spokes for truing.

Tightening the spoke nipple will guide and pull the rim to the left or right laterally as well as pull it inward towards the hub.  A diagram below illustrates this.

Cross Section of WheelIn this diagram, several of the elements were recreated from the first diagram (the spoke, spoke nipple, and rim).  This is a cross-section of the rim to show how tightening and loosening the spokes will cause the rim to move to the right or left.  Notice that the spoke and spoke nipple does not anchor to the rim at a direction 90 degrees, but at an angle because of the fact that the hub (the center part of the wheel) is wider than the rim.  If you tighten the spoke from the spoke nipple in this diagram, the rim will be pulled to the left.  If you loosen the spoke from the spoke nipple, the rim will move to the right.  This is how, over the course of the rim and all the spokes, that the rim can be straightened and thus, trued.

Now that the concepts are a little clearer, we can then focus on how much to tighten and loosen the spokes.  Once a wheel is built the tension of all the spokes should be relatively even.  Factory built wheels tighten all spokes to a specific tension, causing the rim to usually be slightly out of true once it gets to the shop from a distributor.  The reason that the rim is not true from every spoke being at the exact same tension is because of all the variables in the wheel add up and even high quality parts have small imperfections and variations in machining and manufacturing, summarized by the term, tolerance.  Remember that term because it will come up later.

When truing a wheel, it is wise to make small adjustments each time until the rim is straight (1/8th turns to 1/2 turns).  Never just crank down on one spoke and tighten it until the rim straightens.  This will cause uneven tension of the wheel, which will lead to spokes breaking and the rim to develop a ‘set’ and a shorter lifespan.  Spin the wheel and notice how much the rim moves side to side and settle on the worst sections first.  If you see the rim move to the left or right over a section, take note of how many spokes pass throughout the bend.  Find the worst part of the bend and tighten that spoke about a half turn and then the spokes on either side coming from the same side of the hub.  Tighten those spoke less and less the farther it gets from the spoke you first tightened a half turn, tightening less as the bend recedes.  Lightly squeeze spokes with your hands and spin the wheel in between truing to settle the adjustments.  This ‘shares the load’ between the spokes to straighten that section of the rim and allows the tensions to be gradually increased.  The spokes in a wheel do not work individually as much as being a team.  All must help to share the load of the rider on a bike.

Earlier I mentioned that spokes could also be loosened.  This is only really acceptable in very small amounts and as a second option after tightening spokes.  Loosening decreases tension in the wheel, which can also lead to spokes breaking and less threads engaged in the spoke nipple.  In particularly difficult sections of a rim, tightening and loosening is used to correct a bend, but only with practice and experience over time.  Even with this basic tutorial to help you better understand how a wheel is trued, your first few wheel truings will be a little frustrating.  Know that as you progress and true more wheels, you will begin to understand how much you must tighten a section of spokes to eliminate bends in the rim.  Lastly, sharp bends in a rim are nearly incurable and you will notice that one or two spokes must be tightened by a large amount to even get the wheel ‘mostly’ true.  If this is the case, the rim may need to be replaced and new spokes.  The spoke itself is very very strong and can easily hold 300lbs hanging from its end without much wear.  This being said, the spoke’s main enemy is uneven tension and the fact that there are only so many threads on the spoke’s end to tighten.

In summary, remember these two things.  No spoke works alone and thus, tighten groups of spokes to share the load small increments at a time.  The tolerance of machines and production allow a wheel to be only so true.  Low quality wheels can be trued to moderate expectation and high quality wheels can be trued to high expectation.  This is the difference in tolerances of machining.

Feel free to email or message me regarding any questions you might have.  People have written many books on this subject and I could continually talk to you about wheel theory all day.  Hopefully this article will help you to better understand wheels, how they are adjusted, and your confidence in being your own bicycle mechanic.  Thanks for reading.  Monday night, I’ll be posting Part One of the Specialized Turbo S Long Term Review and what things I have come to learn about working on them, adjusting the electronics, and general knowledge as far as how the technology is progressing.


– SNC


What’s in the stand today?

This is what I was working on today….

This slideshow requires JavaScript.

Specs are as follows:

Specialized SWORKS Shiv frameset with integrated aero brakeset, seatpost, and Sitero saddle.  This was a stock build I had etched up a few months back and it had been sitting on our Specialized wall with some grandeur.  It’s spec’d with a Dura-Ace 9000 groupset with time trial shifters.  Zipp Beyond Black stem was swapped for the standard stock stem setup in order to run a Zipp Vuka Bull base bar with TRP carbon brake levers and Fizik matte black tape.  The wheelset currently is a nice set of CXP80 Cosmics, but likely will be switched to Zipp 808s.  It’s a really great aero build that will be the epitome of stealth and craftsmanship.  Since I built it accordingly before, it’s been easy to set in the new cockpit and all that is left is to route the new cables and tune.  Other pressing projects intervened this build today including a Di2 upgrade on a Caad 10 Synapse frameset, a SWORKS lululemon Amira with Ultegra Di2, and an SWORKS hardtail Stumpjumper that needed a final bleed and hose replacement for Formula brakes front and rear.  That was also a great build last week that I should have a finals slideshow for tomorrow evening or Sunday.  Internal hydraulic routing and XX1 group with a nice tubeless setup.  Anyways, I’ve had a long week and got a lot of great projects out to happy riders and need some rest.  I’ll have a short article on some tech stuff that has been important to the industry lately tomorrow.  Thanks for checking things out!

-SNC

Park Tool Summit 2013 In Review

I was able to attend six of the eight classes offered at the 2013 Park Tool Summit.  They were the following: Campagnolo, Cane Creek, FSA, Fox, Mavic, and Shimano.  I am going to cover each one and what I thought were the best points to take and apply in the shop. Right below is a slide show of photos I took (sorry for fair quality with cell phone) before the summaries of each class.

This slideshow requires JavaScript.

Campagnolo:

The same instructor, who deals with just about every Campy warranty and issue in the US department, was informative and innovative considering that a pallet of half the working material was still somewhere between the headquarters and the summit.  Inside views of the Romanian factories and the home factory in Vicenza, Italy.  Before recently, Campy was high on security and secrecy to protect larger companies from gaining insight on their special technologies and process.  Now, however, they have adopted a much more transparent view of both the parts diagrams and breakdowns and the environment itself in which the parts are produced.  Because of the demand for such quantities of these quality components, special precise training was exacted for the employees of their two Romanian parts manufacturing facilities dubbed Mechrom 1 and Mechrom 2.  Most of the final assembly of parts is done in these facilities.  They have a great traceability program to ensure that the products and parts are accounted for and distributed correctly.  For instance, every wheel built has a dot matrix code attached that contains information as to the individual that built the wheel and the exact final tension specs, ensuring the rider that the product is as perfect as possible.

Also, various innovations have been discovered and engineered by Campy that have spread to other industries because of the care and accuracy they hold their standards to.  NASA aerospace chassis designs, the formula for casting magnesium (a very very light material), and the first magnesium wheelset are but a few of them.

Great focus on chain design was taught.  Every chain created undergoes over 1200 lbs of force to “pre-stretch” them so they last longer and run smoother than any other chain.  No rider can exert this type of force which entails literally zero broken chain other than if the installer does not install it correctly.  Also, as a side note, installing a “quick link” voids the warranty as they believe only their chain pins meticulously pressed in will be strong enough to support it.  In addition, they recommend installing the chain in the smallest chainring and smallest cog to get the right amount of tension.

Cane Creek:

It was obvious for this seminar that Cane Creek is highly focused on connecting riders together and sharing their experiences for the best ride possible.  They seem to have an attitude of figuring out how to make each rider’s bike settings and technologies work best for that individual by developments in things like changing the angle of the fork and detail tuning their new Double Barrel rear shock.

One surprising note to mention in regards to their very successful headset sizing system (S.H.I.S) is that almost all headsets on the market have been narrowed down to 6 top bearings and 4 bottom bearings, making the system even easier.  As far as changing the angle of the fork mentioned earlier, bowl-shaped cups hold the bearings that are placed in eccentric matching cups in the headset for several different angles that they include as one set, so you can try different combinations for better climbing or better descents, etc.  Also, even with this new system, Cane Creek has a headset fit finder with a database of over 10,000 bikes already and adding new ones each day when submitted by mechanics and other in the industry.  This is awesome as it compiles so much data from so many companies and locates it in one place, leaving the guessing game far behind.

The biggest highlight for me was a detailed summary of their 110 headset.  From cutout diagrams, you could see the multiple seals keeping the bearings sealed up nicely and backing up the 110 year warranty.  Essentially, it is waterproof and to me, rivals the Chris King headset that is also popular by name and by its own sealed system.  I mainly think it is just good to have a choice of two almost indestructible headsets.  Plus, regardless of which one it goes with, they will quickly replace it if you somehow are able to destroy it.

The Double Barrel rear shock is a great product to explore as well and has so many options for fine tuning without problematic issues that usually arise with other rear shocks with leaking, etc.  Seal replacement was very easy and clear to understand and the hands-on experience of doing so really “sealed” in the information.

FSA:

FSA (Full Speed Ahead) was all about ensuring that their products get better and better and flaws and defects get smaller and smaller with genuine rider honesty of feedback and a willingness and commitment of the company to fix any problem.  They were the first company to develop a carbon crank with longevity.  Their SLK series has been continually refined with each season of testing as well as their Gravity line for downhill bikes.  Being that they are located near Whistler and other major downhill areas, the testing grounds put the equipment and research through extreme trials to bring us what we have today.  One cool addition for customer service was a placement of an office on the East Coast to help eliminate the waiting period of time zones to contact representatives.  This creates a faster turn around and closer connection of rider to mechanic to rep.

They also have a headset that was developed much like the one I mentioned earlier with Cane Creek, but their point of interest was to develop one that had fewer parts and a more robust interface that could be depended on in harsh conditions.  Great length was also taken to “creaks” and “clicks” in integrated bottom brackets, so naturally I wanted to turn a keen ear since I wrote an earlier article on bottom brackets and issues that arise.  Several things like the correct materials for installing bearings and retaining them with loctites and compounds that wasn’t as clear before as to how essential it is to choose the correct one.  Moving from so many different types of crank spindles and bottom brackets has led them to the development of their BB386 spindle and bearings that is the same size for all of their cranks.  They make different qualities of these, but all of the are the same so compatibility is a non-issue.

Fox:

Fox seemed to hold a different approach than any other class.  They split theirs into three separate mini-classes with hands-on working at each.  The groups rotated and gained insight on several areas from bushing and seal replacement on forks to lockout tuning and rebound damper adjustment.  The most useful in a business sense that they now offered is the bushing and seal replacement.  Developing a new tool with Barnett’s Institute, it allows bushing replacement on any fork including Fox and passes the ability to do some services at the shop level rather than always sending it to Fox to have work done.  This means that I can get a rider back out on the trail faster and that makes a happier rider.

After the first day of learning, I got to speak with the Fox rep at the social hour following the day.  He showed me a suspension unit that is installed on the new Raptor off-road truck.  I lifted it and it was quite heavy as trucks are far less concerned with being light rather than strong.  It led to something that I wouldn’t have expected.  He said that most people think that the bike fork technology and suspensions are derived from their larger parts on off-road trucks and ATVs, etc.  He said that this was quite the opposite.  The bike technology was hardest to innovate because it not only had to be really strong, but also light enough to ride and that this technology was what actually trickled up to ATV suspensions and then to off-road vehicle suspensions.  Pretty cool.  They also seemed to be having the most fun out of the other companies.

Mavic:

Mavic was, personally, a beautiful sight to see.  Slick blacked-out wheels and carbon spokes all over the place with matching yellow hinting everywhere was the realm of high-end wheels and superior technology.  Not only were several points of misconceptions I had cleared up, but it was also confirmation of several things I had been doing right.

Mavic has a philosophy that their wheels are made as a system from the center of the hub all the way to the ground — including the tire.  This is why all of their wheels are sold with tires installed.  From flashy animations of hub overhaul procedures to French dialogue speaking of dedication to ultimate advancement in technology, they covered essential procedures for replacing carbon spokes in two different wheels (R-SYS and Cosmic Carbone).  Plus, the guys teaching the class were the guys that fix the wheels or rebuild them when we send one back for service.  It was like finally meeting the guys who had done all the great work I see coming back in shipments and on display in the shop and getting a flavor of their standards and tips.

One thing that really stuck out that I didn’t know before was that they use mineral oil inside the freehub body with a bottom seal.  Mineral oil, they said, wasn’t some magical liquid, but just that it was exactly the right “weight” to stay inside and give the freehub years longer of usage and, in its absence, is why some riders have described a high-pitched squeal at times on fast descents.

Shimano:

While much of the material that was covered in the presentation part of the class was what I had recently just finished training on, it was still reinforcing and provided confidence in the hands-on tuning of the new Dura-Ace 9000 drive-train.  With its sleek machined appearance and unbelievably improved smooth performance, I have to contend that all three major companies (Shimano, Campagnolo, and SRAM) have narrowed the gap between each other and the game is at its highest level ever.

The new and improved cables and casing also surprised me to its superior feel and had me thinking they snagged the designer for the Gore Ride-On cables that were just discontinued.  Coming now in seven colors, the PTFE coating is uniquely applied so wear doesn’t affect performance nearly as much as before, allowing riders to use them for longer with better results.  The motto, “friction is the enemy,” really rang true here and great effort was placed into decreasing it and its effect on rider fatigue.

Summary:

All in all, as stated above, the technologies are getting more and more efficient and precise with faster rides and sexier designs.  It’s going to be really exciting to see how far they can go in the next couple years.

– SNC