Welcome to Part 2 of 3 in my Specialized Turbo S Long Term Review. I feel like this is some of the most essential information that I can apply in one place that will keep Turbo pedalelecs running beautifully. However, I do feel that there is a “low-ceiling” limit to the depth that the Turbo can be maintained — even by an experienced and well-equipped shop. In certain instances, the bike may have to be sent to the factory. I am of the belief that this is being addressed and the bike will become even more modular and accessible. That being said, there is a ton that will be covered here and includes several years of work and knowledge. While I will be mostly highlighting troubled issues, the Turbo overall has been very trouble free and generally without issue. This just compiles issues from many Turbos I have serviced since their release.
Onward.
So, I turned on my Turbo and started pedaling and the motor did not kick in as expected in Full Active and Eco modes. What’s up with that?
I am starting with this problem because I think it has occurred more than any other issue. There are a number of symptoms that cause it to happen and a number of solutions. First, the battery is nearly dead. Charge it up and try again. The next thing I would try is to simply turn it off and turn it on again to try it. This occurrence has spanned several Turbo S bikes on a rare occasion and has been remedied every time in the shop. The next reason it might not turn on is that the battery may not have been installed properly or the pressure plate at the bottom of the battery “hanger” is not correctly adjusted.
With the battery pressure plate, I have found it to be different on each bike and definitely has a “correct” pressure for the Turbo to function right. On the bottom of the bike behind the bottom bracket is an access plate that is secured by small 2mm bolts. Remove these and set aside in a magnetic parts tray so they don’t end up lost on the ground. Once the anchor plate has been removed, look inside and you’ll see wires, a couple hex bolts, and the shell of the bottom bracket. Locate the 5mm hex bolt right in the center anchored into a flat plate. This is an adjustment bolt for moving the battery up and down within the battery dock. It provides pressure against the battery so vibrations do not disrupt the connection at the opposite end of the down tube. To be noted, one would likely expect the phrase, “Why not just crank that thing down and really lock it in there?” Well, here’s why. If the motor does not seem to be engaging as aforementioned, this same issue can occur if the battery is adjusted to tightly in the dock. Just as the battery has a little “wiggle” room, so does the connection to the battery inside the frame at the top tube and head tube junction. If you remove the battery and look at the top of the battery dock, you’ll see where it plugs in. With your fingers or a scribe, you can definitely see gaskets on the side of the connection and its ability to move slightly up, down, left, or right with a small amount of push. The general rule is to begin tightening the pressure plate while using your free hand to try and move the battery up and down in the frame. If you hear any sharp noises when it contacts the top or bottom, continue tightening. Once there is little movement (0.25-0.5mm), stop tightening and use the key to remove the battery. If it is too tight, it will be difficult to get the battery out. I have found that each Turbo is slightly different, which is a great reason to have the plate for adjustment.
Another item to check is the connections between the brake and the control unit and the connection to the wire coming out of the frame. Also, as a measure of being thorough, there is an additional connection inside the frame at the head tube where the light plugs into a parallel connector with the control unit (Several times, fault signals on the battery will indicate the light and control unit both having an issue when it is mostly one or the other). By checking these connections, I imply: Are they tight and correctly aligned for the individual connector pins? Have you applied a tiny amount of dielectric grease to the threads of the connectors? Are the connections and wires constantly rattling or loose? Try checking each of these regularly when servicing as a quick way of eliminating them in the event of an issue.
So, I turned on my Turbo and everything started up, but a flashing code reading “short circuit” is displaying on the control unit? Is that bad?
Well, it’s not necessarily good, but can be fixed easily. Sometimes, constant vibration, continued exposure to the elements, and leaving the rubber charging cap off of the Turbo for extended amounts of time can cause an interruption in the electrical system and send a red flag to the control unit. It’s a feature designed to override the system much like a circuit breaker so no damage occurs to vital components. By using the Turbo diagnostic tool plugged into the frame (with battery in) and into a laptop, you can run the diagnostic software and release the hold on the circuit with a convenient button on the screen. This software is a very important tool in confirming that the motor, battery, control unit, and lights are working properly and displays a wealth of information and reports for keeping Turbos happy and healthy.
My Turbo has gone insane and decided to run at 28mph like a throttle as soon as I hit the pedal. I don’t even need to pedal. Glad it’s spec’d with great disc brakes. Does it need an exorcism?
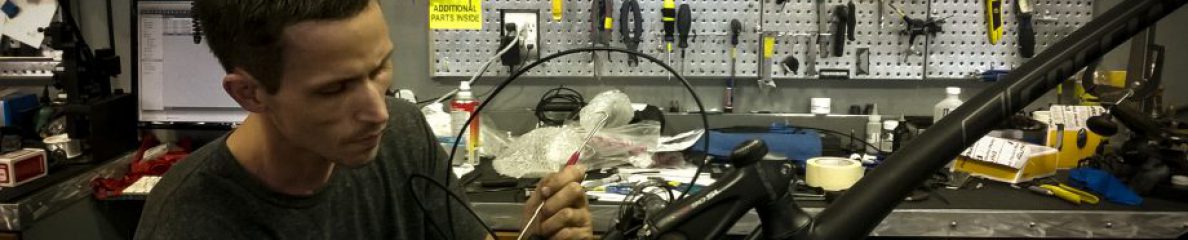
Not quite. In the early days, Specialized might have taken this approach, but with the “Innovate or Die” theme currently in trend, we now know it’s quite real. This issue has only occurred once, yet is important enough to catalog and solve for any future happenings. In my prior post, I detailed the symptoms of the bike while it was secured in the bike stand. I took the opportunity to remove and clean some of the components on the bike and the frame (After slowly and carefully removing the kickstand, I have realized that unless it is absolutely necessary, don’t ever remove it. It is tedious because of the frame angles to loosen and tighten the 8mm hex bolt and I found that it didn’t improve access to the electronics and pressure plate under the bottom bracket. It is a very sturdy dual kickstand that stays tight and balances great.). That being said, I removed the bottom bracket (EVO386) with a socket and outboard cup adaptor and found plenty of access points into the frame to see the wires running to the motor and seatpost LED and the hex bolt adjustment for the pressure plate (5mm) and the lock mechanism with it’s integration into the battery release. I wiped the battery dock and the battery with isopropyl alcohol. The terminal connections were also cleaned with isopropyl and a swab. With some time open in the service schedule, I also decided to remove the external frame charger / battery dock connection unit from the top end of the down tube to make sure all of the connections looked secure and free of debris and moisture. Thanks to a well-sealed compartment, everything looked great. I took notes as well on the direction, colors, and pairing of wires that interfaced with the unit. Red and black paired wires run directly from this to the bottom bracket shell, under the EVO386 BB, and through the non-drive chainstay to the external port near the rear wheel. A shorter set of these two wires also connects the battery dock connection to the external charge port. Two sets of blue and brown wires run from the unit to the headtube and into the brake / control interface and also to the bottom bracket shell and into the seat tube to connect into the wires running from the saddle’s integrated LED through the seatpost. One triple set of wires (blue/brown/green) run from the external charge port in the frame to the top of the battery dock where the battery connects to the system. Lastly, an orange wire runs from the front light to the connection with the control interface (wired in parallel). As a side note, this is why the diagnostic on the battery will show both the light and control interface having an issue when it could potentially only be one of them. Good things lights are pretty easy to check.
Once I had satisfied my curiosity of understanding the Turbo S better, I moved on to reinstalling the parts and activating the wheel like before. I let it run continually for over five minutes with no discernible change. Continuous operation, only to be paused by giving the brake a solid squeeze. If the wheel was touched, the throttle would pick up again. This was also true for pressure on the pedals. In these situations, I was lucky to have another in the store to help eliminate components. Taking a brand new rear wheel from the second Turbo (after testing to make sure it was operational), I installed it into the first and powered the system. No activation of Full Active or Eco modes, but No Power worked as expected and Regen mode seemed more difficult than normal as mentioned with the original wheel. This is the only area that I am not quite sure what to think of yet. That’s what the techs at Specialized are for. Continuing with the diagnosis, I also swapped the battery with no effect. Reinstalling the original wheels and batteries to each Turbo, I then swapped the control interfaces. This also did not yield any effect. With the original wheel, the throttle accelerated as before (One thing I might try today is to try both battery, control interface, and new rear wheel from the second Turbo into the first.). The last thing I did was to put the wheel from the service Turbo into the new Turbo. It accelerated to 28mph. Thus, my conclusion (though I will wait for confirmation from Specialized) is that the wheel needs to be recalibrated–specifically the motor. If this is the case, it will go back to the factory for a quick turnaround and then I’ll have an update on a future post about the issue’s resolution. This was a great opportunity to fully inspect the bike from top to bottom, inside and out.
I am going to continue this post through the weekend with some other minor issues and fixes that will keep the Turbo S running smooth and fast, but figured that it’d be good to start posting the article for any feedback or questions.
Here are photos of the above parts:


More to follow! – SNC

Okay Dr E, I have four of the Turbos. My 2013 Turbos have quicker acceleration than the 2014. The 2014’s when you first apply pressure to the pedal are sluggish and just don’t get up to speed as good as my 2013’s. The torque seems to be lagging… Thoughts?
Next up, the Euro versions are very fast. Can we change the USA counterparts to meet Euro standards? I’d be more than happy to ship to the wizard of Zen Power 🙂 Jeff
I’ll dig into this further once I have done a little more research, but my guess would be one of the following and it would also likely have to do with the second paragraph of the component difference between USA and Euro mods.
So, realizing the Turbo is a high-end pedelec, you would probably think it applied power based on measurement of torque on the pedals by the rider. Thus, some type deflection sensor near the rear wheel axle would measure how much that wheel deflects when pedaling and add the power according from the hub motor. As I mentioned in the lower end models, they simply calculate added power from the hub motor based on a cadence magnet sensor placed at a particular position in the hub shell. Since I don’t expect this on the Turbo and, with a lack of external torque sensor, I would imagine they tucked it nicely inside the hub motor. I have not looked inside the hub shell yet, but an access port does lead into a connection on a circuit board, which is likely used to ‘calibrate’ the motor as some serviced wheels I have seen needed for a repair. In the 2013 to 2014 models, the battery obviously became quite a bit more powerful and I am under the assumption that some redesigning of the hub motor was necessary to calibrate it for the longer run times for optimal performance. Possibly the programming of the software would also add to it. The hub motor is likely as powerful if not moreso with current firmware and refinement of the sensors or using a slightly different sensor would account for the difference. Concerning firmware, I would suggest having the firmware checked on all of them to ensure that prior models are running the most optimal version.
Concerning making them more powerful would be through either software bypass (which would definitely void the warranty) or by using a different controller (something like Cycle Analyst 3)(this would also void the warranty). Since the bikes are designed from the ground up versus aftermarket packages, they tend to be more durable as a unit and bike and the company support is great, but less configurable without severing some sort of benefit.
If I can come up with any other information, I will be sure to update the article. I am also going to check returning cyclists Turbos and the current ones in the shop to note the differences. Thanks for the comment and question.
Thanks! I’m still thinking there is something else going on here. Not sure how Specialized can say there is no change, but there clearly is in power ratio. The jump off the start is very noticeable. Please let me know what you find out…
Also, how do you update the firmware on the bike? Thanks Dr “E”
The firmware is updated through a local dealer shop with a diagnostic tool that can change certain values of the power and shows voltage readings and other data that can help to see if each component is working correctly.
That actually leads me to think that it could also be simply the acceleration values that you can change for the different power modes (Full Active, Eco) and the setting may be a different default value on the newer ones. If you can, take them to a shop to check the added power values for those modes. It can be anywhere under 300% I believe. I will confirm that to be sure. The 2013 models might be set at a higher value. You can also change the percentage of the Eco mode as well.
I would check this before any of the hardware related things.
Bonjour Pixallia,
J”habite en France et possède un turbo 2013 avec une batterie 342 w/h ainsi qu’une batterie 504w/h. Achat en mai 2014. L’interchangeabilite des 2 batteries fonctionnait bien jusqu’en mai 2015 puis le velo s’est mis en shortcut, m error. Le velo est parti à l’usine en Hollande pendant 1 mois, un probleme de mis a jour aurait ete diagnostiqué. Revenu chez moi il a fonctionné jusqu’à maintenant mais il se remet en defaut avec la 504 w/h mais fonctionne parfaitement bien avec la 342w/h. Cette batterie serait elle défectueuse ou pensez vous a un autre diagnostic. Merci de ce que vous pourrez faire pour moi. You can speak in english. Guy
Maujean, I must translate this, but will do so and help in any way that I can. Thanks for commenting! I am very happy that people are continually taking notice of my troubleshooting for Turbos.
– David
Guy, I am checking into a few things about the batteries you have today at the shop. From what I read, the 504 w/h battery is not working correctly, but Google translates it to “recovering in default.” One of my co-workers speaks French and I will have him read this to me. One of the first things I would have you try to is go to a Turbo dealer that has the diagnostic tool in order to get an error report from the battery. This report is a record of every failure and reading possible and will show if there is a bad cell or something. I will follow up with more. Thanks! David
David,
Thank you very much for your reply
I’m waiting for my dealer to lend me his Turbo.He suggested to test my bike to check if there are any problems with my battery.I’m quite sure that the problem comes from it for my bike has already been sent to Specialized Industry in the Netherlands to make a software upgrade. When it was sent back, the battery 504wh still didn’t work whereas the 342wh worked perfectly well.When I bought my bike in 2014, both worked quite well and I could use them interchangeably. Is there something I can do on the battery?Is the diagnosis tool available for the users and how much is it?I’ll keep you informed whenever I know more about it.
Bye for now,
Guy
Great website with lot’s of useful information. My Turbo’s seat post rear light stopped working 2 days back. I disconnected the wires and notice there is no current coming to it. The seat light works when connected to an external battery so there is definitely something wrong with the current flow in these particular wires. The front beam works fine.
I tried to trace the wires for the seat post by removing the bottom pressure plate but the wires seem to disappear under the EVO386 and not sure how I can access them to the source of current. Is there any other wire I can tap into to connect my seat post light to? I was wondering which wires lead to the front beam, perhaps I could splice them and connect my seat post light to them. That way they’d turn on when the front beam is turned on also. Do they also pass somewhere by the pressure plate or would you recommend getting a connection somewhere from the front? Perhaps from the little access plate on the front right side?
Will wait for any suggestions. Thanks.
So, the lights ‘should’ turn on at the same time in any case, but there is a fix. The wire for the rear LED is very basic and a speaker wire the same gauge will work great. The wire goes over the EVO386 BB and passes around the pressure plate to the recess underneath the battery in the downtube. If you remove the battery from the frame and peel up the rubber padding the battery rests on, you’ll see the wires running up the length of the downtube. I will have to check which exact one it is, but they stay the same color casing all the way up to the junction where the battery plugs in. Removing this part (the upper battery connection) is not super difficult, but needs caution and attention to detail to perform properly. Once unattached to the frame, the whole unit can be examined from the backside of the battery port and you’ll see the wires connecting in parallel to the front light and then into the frame. Replacement of the wire is possible, but I would think Specialized would cover the part replacement and you might have a little bit of labor cost. This is possibly worth your time rather than doing it yourself as routing that new wire is not easy. I will look at my log of photos for the Turbo and see if I can’t post a few that depict these steps. Let me know if this helps any.
Thanks for your reply. I see several wires visible under the pressure plate. Apparently the split for the front/rear lights happens somewhere in the crankshaft because I see a separate pair of wires coming from the back that travel up the seat-post for the rear light and a few other wires going up to the upper battery connection which are also visible under the battery rubber padding that you’d mentioned. The seat-post wiring does not carry any current at the moment, something probably got dis-connected in the rear that I cannot access and I will probably just have to tape the ends. Instead if I can find out which pair of wires that are visible under the pressure plate actually carries the current to the front light, that would be the easiest for me. I can just splice them and take a parallel connection up the seat-post for the rear light.
Flipped the bike over and had a better look at the wiring yesterday. Apparently the rear light wiring is coming from the front wiring harness and not from somewhere in the rear as I had previously thought. That would explain how it is connected to the front beam and also controlled by the same switch. I believe the front wiring harness will have to be checked to see for any broken connectors and as you have recommended, it would be better if I have this checked by my local Specialized dealer. Thanks again for your advice.
That’s what I am figuring. Perhaps moisture got into that section of the frame at the front junction and shorted the wire or maybe pulled loose. Please let me know what you find as a solution and I will update the article concerning the problem and fix. Thanks!
Do you have any idea why my S-Turbo model does not have the same acceleration as my first one? Ive got four of these bad boys and the 2014’s lag in torque ? Help!
As I mentioned a while back, it could be one or more of several causes. The software refinement for better battery life or other programming could easily be it. The simple solution here is to bring it to a Specialized dealer and have them run status reports on each component and then email these to Specialized for analysis. This way, if something is actually wrong rather than refinement of the torque sensor software, they’ll be able to service the affected part or send a new one.
I let my Turbo battery revised. Know the bike doesn’t recognise it any more. All 4 lights blinking… What can I do?
If it is a 2013 Turbo (first gen), start up the bike (even though the battery will turn off shortly) and make sure the computer lights up. then, even if the turbo is off for a minute or so, you can access the functions. Click Mode until AVG SPEED comes up. Then, hold set for 2 seconds and it will switch to Pairing Mode and say ‘OK to pair?’ and click Yes right after starting up the Turbo battery again. Begin to pedal the bike and it will register on the screen if Pairing works and say Bike Found and BELT Found. after another minute or so, the screen will go back to the regular screen. Start up the Turbo and it should work. later generation Turbos do not have this feature and you may just need to bring it to a shop for diagnostic with the Turbo software.
How can I change the saddle without messing up the battery wiring? Would like to install a different saddle on the 2016 Turbo S.
If it is the model where the light is integrated into the saddle, you would simply unplug the connectors and feed them back into the saddle. if Specialized still has them, you should check for a 2013 Turbo S rear light. It uses the same connectors, but is mounted on the post itself rather than the saddle.
Can I remove the front lights without disturbing the battery power? How?
Yes, simply use a 2mm Allen key to remove the screw holding the black frame fitting where the front light wire goes into the frame. Once removed, there is a threaded connection where it plugs in. That’s the only way I know. If you mean to do this while charging, instead look for a cover for it (since the newer Turbos have the lights on while charging or operating).
I just bought a 2016 Turbo X which does not come standard with an integrated headlight or rear light but I’m interested in installing them. I’m planning on purchasing the same Supernova brand that is used on the Turbo S and previous model years. Is it possible to wire the lights to run off the battery like on the other Turbo models? And if so, is there a simple explanation of where and how I’d connect them? I spoke to someone at Specialized and they told me it’d be too complicated and expensive to wire the lights but I don’t understand what’s so different between the X and the S that would make this the case? I’m happy to run some cable through the frame and splice a wire but I also don’t want to mess up any electronics or void my warranty. Any ideas? Thanks!
Okay Evan, so splicing wires will likely void the warranty as I see it. The Supernova light has a similar connector to the one that the display and brake/motor disengage. I am going to look at it tomorrow and see if there is a possibility of running the light inline with the other front wire connectors. There is no frame access point on the drive side for the light to normally plug in like on the other models. So, my guess is that you could pretty easily splice the wires and make it work considering the draw of power by the light is very minimal compared to the motor. I will research this a bit and get back to you. Thanks for the question!
hello , i have now the turbo S from juli 2012 (first in BELGIUm) and i am struggling now with a bike which doesnt work proparly anymore. i have done almost 40.000km and when i hit al little bump the bike doesnt work anymore.
When i start up the first led flashes, do you have an idea which connector this can be?
greetings
Dirk
Yes, it is the diagnostic LED for the battery. My guess is that the high mileage the bike has seen has caused the battery support plate to slip over time, allowing the battery to rattle and lose connection. I would suggest taking it to your shop and have them check it out. They would remove the small black plate under the bottom bracket and using a long 5mm hex key, tighten the plate until there is only a small amount you can move the battery with your hand.A small amount of movement is better for the battery so it doesn’t vibrate as much. Hope this helps!
Fun times. My 2016 Turbo S hit the road a few weeks back.. Damaged the seat, headlight, brakes, pedals, grips..
Specialized dealer can’t restore to new because Specialized says they aren’t making parts for the bike anymore (Specifically, the saddle (which has integrated lights)) and the headlight).
Any thoughts/advice? Looked on ebay, craigslist.. nobody selling those parts, Specialized not making them.. Jury rigging lights onto another seat looks pretty bad, and the headlight is hard wired into the battery, doubt specialized would warranty another thing attached to their power source.
I called Specialized directly, and they didn’t seem to even know the 2016 model HAS a headlight (I asked them to look at their own website..).
Sort of annoying, buying a Turbo S is like buying 1/2 a cheap car.. to not carry parts beyond the model year is lame 😦
I agree. They have switched their design model to have a much shorter wiring harness and a mid drive motor rather than a hub motor for the upcoming models. While they should have some spare parts for the older models, you definitely need to go through a Specialized dealer to get them if you have not done so already. They will not generally work through any other route. Hope that helps. Either way, there are aftermarket generator lights with the same connections that could work as a suitable replacement.
Hi
I have a turbo s ce 2016 and a rental Akku with 342wh. These Akku has no speed limit I can 55kmh and more drive. With my 691wh is just 45 km h. How can that be?
It is controlled by a governor that prevents the motor from overheating or burning out. Specialized sets that limit so their lifetime expectancy of the bike is more guaranteed. Other manufacturers may push the limits a bit more or less based on what they want the model to do.
When I start my 2015 turbo x the first, third and fourth blink and the bike shuts off.I have tried everything in the manual and it still does the same thing What do you think?
George,
This case usually ends up being a new battery. It is not that the cells are necessarily bad but the ‘brains’ of the system are integrated into the battery and it may be having difficulty recognizing everything. Past that, it could be the wiring harness. If you go to a Turbo Specialized dealer, they can run a diagnostic and see if the problem can be narrowed down further.
Hey,
I have a Specialized Turbo S model 2012.
The display light does not turn on when I turn on the lights.
The battery, CR2032, I have already replaced.
Again someone a solution to this problem?
regards,
Jeroen
Jeroen,
It is likely just a bad LCD. I have seen it several times and if you have replaced the battery and checked the connection, it is usually that.
Hi,
I have a specialized turbo s 2013.
The problem is that after driving a while the motor stops supporting.
It happens when I stop to pedal – the speedometer shows the last velocity and it doesn’t reduce although I’m getting slower. To get supported again I have to get over this last (still displayed and somehow frozen) velocity.
The bike was at the dealer two times for several weeks and they told me that they exchanged everything (motor, cable tree, I think also the battery). For me it sounds like a more trivial problem with the speed sensor. Any ideas what I could try before I go to the dealer again?
Best Regards
Thomas
Lastly, in conjunction with what I told you in the other posted question, you can also replace the remote. They, like anything else on the bike, can have an issue with the wireless communication.
Hi,
maybe you have an idea. I have a turbo s 2013 – I’m totally frustrated as the bike was at the service two times already and each time they told me it was fixed. Actually it was even at a specialized service point and the mechanics told me they had replaced almost everything there (motor, battery, wiring). But the problems still remains – after riding a few kilometeres the assistance stops and the speedometer freezes (at a certain speed). From that point on I only get assitance if I manage to go over this last recogized speed again.
Sometimes it heals (not fully) but at least the speedometer shows a decrasing speed – but really sluggish.
It heals fully over night but then again after a few km same problem.
I also tried to ride without the speedometer to exclude this as an error, but still no success.
It seems that after some time there is no signal for a decreasing speed and this seems to disturb the software controlling the support.
Any ieas would be welcome,
Best Regards
Thomas
Hey, so this could be several things unfortunately. When there is substitution of the major components, it usually fixes the problem. However, before going to extreme measures, I would really thoroughly check every connection on the bike. I would also check the connection from the motor to the wiring harness on the non-drive side chainstay. In replacing the wiring, it is possible to mix up or reverse the new plug because the connection plug is installed after the separate wires are ran through the frame. Check that because that can cause issues with the motor cutting out and the torque sensor not communicating correctly with the BMS. Lastly, I would then have the shop use their Turbo Diagnostic Tool to run an error report that can be emailed over the Specialized for interpretation. Usually if there is a red flag, it will show up there.
Hi – Have the Turbo FLR. Love it but when the battery runs down to 30% it kick me out of the Turbo setting and into Eco mode. Does any one know why is does this with 30% power still left in the tank and can it be adjusted?
Thanks
Si
Yes. It should be in the user manual if you Google it. I would search for Turbo FLR manual My16 and the PDF should pop up. I believe you need to be in Average speed on the remote and hold the joystick left for 3 seconds until the battery % starts blinking and then up or down to adjust what Eco modes it jumps into. It has to go into eco mode to prevent a deep full discharge of the battery, but you can set the power of the eco to 90%. Hopefully that works.
Can I use a 691Wh battery on my Specialized Turbo 2013, model 2012?
I now use the 504Wh battery.
Yes, it should work fine if you pair it to the remote like the older battery but I would definitely call Specialized and confirm because I know the BMS systems changed a bit for the wireless joystick units on newer Turbos than the 2013 models.
hi, a see you post about turbo S and I want to ask if the TurboLevo have the battery pressure plate? My bike wasn’t work more after a jump
Marcus, the Levo does not have a pressure plate as the battery is attached by a thru bolt at the top and latches into the frame body at the bottom. Perhaps a really large hit might have jarred one or more of the cells loose inside the battery, which would cause it to malfunction. They use the same cells as in a Tesla, but obviously experience a heck of a lot more shaking and impact from riding trails than what the Tesla does on the road. I would contact your dealer about this. If the bike is relatively new at all, they should be able to run a diagnostic on it or try another battery from another Levo at your shop to see if there is any difference. Many times, the initial diagnosis is easiest to accomplish simply by replacing the component and then noting the change, if any. If another battery does not fix the issue, then it is likely something else. If the Levo starts up and continues correctly with another battery, then I would imagine it would be an issue with the wiring harness (probably not since it is short and pretty well protected) or with the motor. I would swap the battery and harness and if it doesn’t work for either, then the motor is likely the problem. Even if the battery were working perfectly, giving juice to a bad motor would cause it to not have any assistance. Please let me know how it goes as I have been trying to compile all of the Levo issues I am coming across (which is very few) so I can add to my “Levo Troubleshooting” article I have been working on. Thanks!
Hi; really great website and thank you so much for it. It’s an amazing bike and it’s sad they are moving away from it.
Two questions; One, I have the rear rack; any thoughts on connecting the lights so both the rear rack and seatpost light work?
Also, in NZ the motor for the S is artificially governed to 300w. It’s actually fine, but I’m curious if there is anyway to increase it to 500w? I’m guessing only the dealer can…
Thanks for all your work.
Chris, thanks for the comment. As far as the lights, you can simply wire the rear rack light into the line running to the seatpost light. The software even for diagnosis in the shop will not let you increase the wattage or remove the governor due to warranty and local laws.